Blog
Introduction
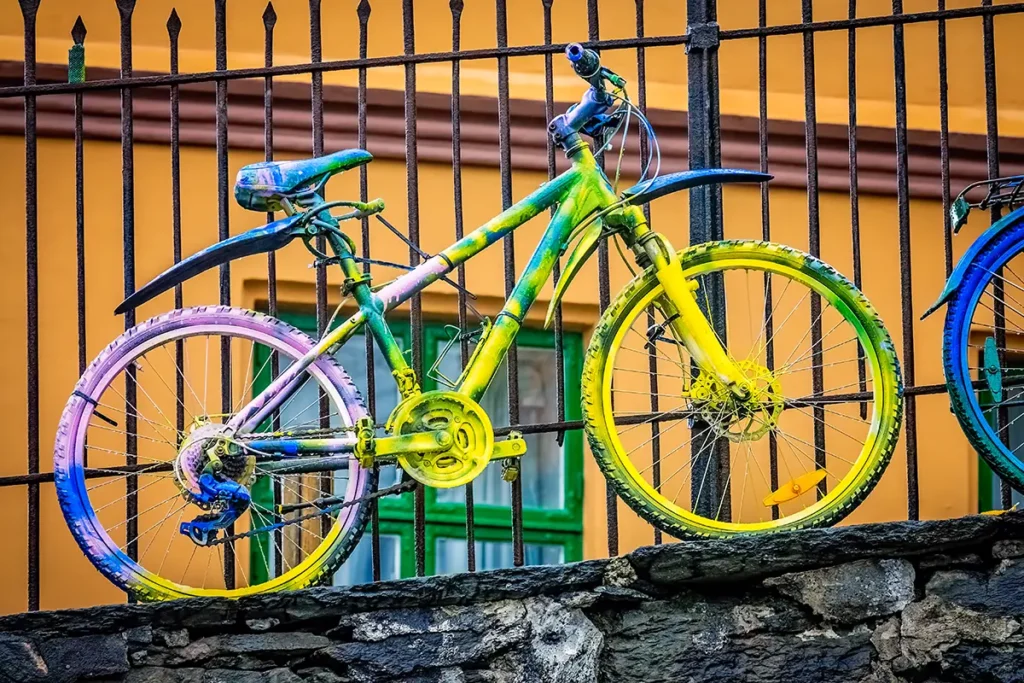
In a world that increasingly values sustainability and creativity, giving new life to everyday objects has become an exciting trend. Among these, the bicycle stands out as a universal favorite. But why consider replacing it when it shows signs of wear, when we have the opportunity to revitalize it? Restoring a bicycle is not only an act of ecological responsibility, but also an economical and extremely rewarding adventure. And this is where the star of our story comes in: fluorescent spray paint. With it, we can transform a worn-out bicycle into a rolling work of art that captures everyone's attention.
Benefits of Restoring Bicycles
The reinvention of our bicycle brings with it multiple advantages:
- Economics and PracticeRestoring your bicycle is considerably cheaper than buying a new one. Furthermore, this practice promotes the development of DIY and repair skills, useful in many areas of life.
- Ecological ContributionBy restoring, we extend the lifespan of the bicycle, thus reducing the waste footprint and encouraging more conscious consumption.
- Personalization and AestheticsRestoration offers the freedom to customize your bicycle to your liking, creating a unique object that reflects your personal style.
- Emotional ConnectionThe restoration process strengthens the bond between the cyclist and their bicycle, generating a sense of pride and personal achievement.
The Magic of Fluorescent Spray
- A Touch of Nighttime MagicFluorescent spray isn't just a fashion statement. Its ability to glow in the dark provides an added safety feature, making the bike more visible in low-light conditions.
- Explosion of Color and VitalityFluorescent colors are symbols of energy and dynamism. By choosing a fluorescent shade, you're opting for a bold and contemporary aesthetic that reflects a vibrant and adventurous personality.
Materials Needed for Restoration
To transform your bicycle successfully and artistically, having the right materials and tools is essential. A precise selection of these items is the foundation for achieving a flawless and lasting finish. Below, we detail the essentials:
- Fluorescent SprayChoose a color that resonates with your personality. The quality of the spray will determine the vibrancy and durability of the color.
- Sandpaper of Various GritsA range from medium to fine grain, necessary to prepare the surface properly.
- Degreaser or AlcoholTo remove grease and dirt residue that may interfere with the paint.
- Clean ClothsTo ensure a surface free of dust and debris before painting.
- Masking TapeEssential for protecting areas you don't want to paint.
- Spray PrimerTo prepare the surface and improve paint adhesion.
- Protective Spray VarnishTo seal and protect the color, ensuring a long-lasting finish.
- Basic Tools: Set of keys, screwdrivers and other tools for disassembling and assembling the bicycle.
Preparing the Bicycle
Disassembly
Careful disassembly is the first critical step. By breaking the bicycle down into its main components – wheels, saddle, handlebars, pedals, etc. – you facilitate access to every nook and cranny, ensuring complete and even paint coverage. This step also protects mechanical and electrical parts (if any) from exposure to the paint materials.
Cleaning
Thorough cleaning is more than just preparation; it's an absolute necessity. Use degreaser or alcohol to remove any traces of oil, grease, or dirt. This step ensures the paint adheres properly and prevents bubbles or peeling.
The Sanding Process
Grain Selection
The sanding process begins with medium-grit sandpaper, which removes old paint and any roughness. Fine-grit sandpaper is then used to smooth the surface, preparing it for priming.
Sanding Technique
Sanding requires patience and technique. It should be done with steady, consistent movements, following the grain of the metal. This practice not only prevents unwanted scratches but also optimally prepares the surface for priming and painting, ensuring a smooth, professional finish.
Applying the Primer
Importance of Primer
The first step is essential in the bicycle restoration process, as it creates an ideal surface for applying the paint. It acts as a bridge between the metal and the paint, significantly improving adhesion and, therefore, the durability of the color.
Primer Application
Apply the primer in thin, even coats, covering the entire surface uniformly. It is crucial to allow each coat to dry completely before applying the next. This drying time not only improves adhesion but also prevents bubbles or irregularities from forming on the surface.
How to Choose a Fluorescent Spray
Quality Selection
The quality of the fluorescent spray paint is crucial to the final result. It's important to choose a brand that offers a formula specifically designed for metals, one that is resistant to weathering and external factors such as humidity and direct sunlight.
Color Choice
The color you choose should resonate with your personal style. Consider the available color palette and select the one that best suits your personality and the design you have in mind. Remember also that some colors may require a specific base or primer to enhance their intensity.
Manufacturer's Recommendations
Always follow the manufacturer's instructions. This includes recommendations on surface preparation, application, and drying time.
Fluorescent Spray Application
Precautions
It is essential to work in a well-ventilated area to avoid inhaling fumes. Always wear personal protective equipment such as masks and gloves. Protect areas you don't want to paint by using masking tape and covering sensitive parts of the bicycle.
Spraying Technique
For even application, hold the spray can at a constant distance of approximately 20-30 cm from the surface. Use steady, controlled sweeping motions, either horizontally or vertically, to avoid drips or paint buildup. It is preferable to apply several thin coats, allowing adequate drying time between each, rather than one thick coat. This ensures even coverage and facilitates faster, more effective drying.
Common Mistakes and How to Avoid Them
Patience and Precision
Bicycle restoration is an art that requires both patience and precision. One of the most common mistakes is rushing the process. Take your time and follow the instructions for each product to the letter. A common error is applying the next coat of paint or varnish before the previous one is completely dry, which can result in an uneven finish or bubbles.
Preparation for Corrections
Always keep clean cloths and other materials handy for quick corrections. If you spot a mistake while the paint is still wet, you can fix it more effectively and quickly.
Varnishing and Final Protection
Varnish application
The varnish not only seals and protects the paint, but also enhances its shine and durability. Apply the varnish similarly to fluorescent spray paint, in thin, even coats. It is vital to allow each coat to dry completely to ensure long-lasting protection against wear and tear and the elements.
Riding the Bike Again
Careful Reconstruction
Once the varnish is dry, it's time to reassemble the bicycle. Do this carefully and make sure all the parts are properly fitted. Take this opportunity to lubricate the chains and adjust the brakes and other components, ensuring optimal and safe operation.
Aftercare
Cautious Handling
Although the paint may feel dry to the touch, it can continue to harden for several days. During this time, it's important to avoid exposing the bike to extreme conditions. Keep it in a dry, safe place, away from bumps and scratches that could damage the finish.
Conclusion
Restoring a bicycle with fluorescent spray paint is more than just a DIY project; it's a form of personal expression and a commitment to sustainability. At the end of the process, you'll not only have a bike with a fresh, eye-catching look, but you'll also have developed valuable skills and gained a great sense of personal satisfaction. Enjoy the ride on your rejuvenated bicycle, a vibrant reflection of your creativity and care.
Frequently Asked Questions
1. What is the ideal time interval between applying each coat of paint?
Although the standard recommended waiting time is approximately 15-20 minutes between coats, it's crucial to consult the specifications of the product you're using. Different brands and types of paint may require different drying times for optimal results.
2. How durable is the fluorescent spray finish?
Fluorescent spray paint can be very durable, especially if applied using the correct techniques and protected with a quality varnish. Durability also depends on factors such as exposure to the elements and how the bicycle is used.
3. Can I use any type of fluorescent spray on my bicycle?
For best results, it's advisable to choose a fluorescent spray specifically designed to adhere to metal surfaces and suitable for outdoor use. This ensures better adhesion and resistance to environmental conditions.
4. How can I correct mistakes or drips in the paint?
If you notice a drip or mistake while the paint is wet, clean it up immediately with a soft cloth. If the paint is already dry, you will need to lightly sand the affected area and repaint.
5. What precautions should I take when painting with fluorescent spray paint?
It is always important to use personal protective equipment, such as masks and gloves, to avoid inhaling fumes or having direct contact with the paint. Additionally, it is essential to work in a well-ventilated area to ensure safety and air quality in the work area.

How to rejuvenate your bicycle using fluorescent spray
Introduction In a world that increasingly values sustainability and creativity, giving new life to everyday objects